Body Composition Guide
To know our progress, we must establish a baseline. We will measure against the baseline EVERY TWO WEEKS.
This will ensure that we are making progress, and allow ourselves to correct course if we are plateauing or stagnating. In short, here is what we will measure every two weeks:
- Bodyweight
- Body Fat % (taken by a professional or a bio-impedance scale)
- Body Part measurements (using tape measure)
- Photographs
.
WATCH THIS VIDEO
Part 1: Bodyweight Measurement
Measuring body weight is the most common way people assess changes in their body, especially when they’re hoping to see changes resulting from proper eating and exercise. Unfortunately, however, body weight measurements can be misleading.
Compare two people:
One person loses 20 lbs of fat and gains 20 lbs of lean mass from a new training and nutrition program. Their body weight doesn’t change, but their body composition shifts dramatically, and they look significantly different (in other words, better).
A second person loses 20 lbs, but all of that weight loss is lean mass. They lost weight, but they probably look worse.
As you can see, “scale weight” doesn’t tell you much about your body composition. Don’t use body weight alone to help you with decisions about exercise and nutrition.
But scale weight isn’t useless. You simply have to interpret it correctly, in combination with body composition. So let’s start with body weight; we’ll discuss body composition later.
Follow these steps to measure your body weight accurately and reliably:
Step 1: Find a scale.
Start with a good scale, preferably a pre-calibrated digital scale or a beam scale (like the kind you find in doctor’s offices).
Step 2: Test & calibrate.
Once you have a good scale, determine its accuracy and reliability. To do so, select an object of known weight (perhaps a dumbbell) and weigh it 5 times successively a few seconds apart. If these 5 readings are within one pound or so of both the known weight, you are good to go.
Part 2: Body fat Measurement
Measuring bodyfat is the most accurate way of seeing how our progress is going. However, it is also the most difficult to measure. For this, we are only going to suggest two different methods of measuring.
Now, there are a few different ways of going about this, and don’t sweat it if you can’t measure your body fat. If you are measuring your weight (part 1) as well as your body part measurements (part 3) – we will get a good idea of what is going on here.
With that said, you can use a few different methods (these are the most common and affordable – there are more accurate ways but they are expensive and time consuming):.
- Bio-electrical impedance is based on the electrical conductivity of body tissues. BI devices send an imperceptible electrical current through the body to estimate the amount of lean body mass and fat mass (as well as total water mass). (there are many scales available today that are fairly accurate)
- Skin-fold caliper measurements use the thickness of the skin at various locations on the body to estimate body fat percentage. This estimate is based on equations derived from hydrostatic weighing studies. (hire a professional trainer to do this for you)
There are of course other methods, but they are unrealistic for most people to perform. So let’s just stick with the easy ways? We aren’t looking for 100% accuracy, but we are looking for a baseline and a way to measure ourselves reliably.
Part 3: Bodypart Measurement (girth)
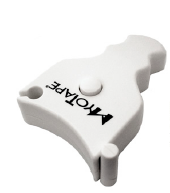
Ahh yes... the good ole measuring tape. The old school way of measuring our progress or lack thereof. Combined with bodyfat %, weight gain/loss, and these measurements, we will have a crystal clear picture of what's going on over the next few weeks.
Step 1: Wrap tape around body part.
If you’re using the MyoTape device (which we recommend), pull the end of the tapearound the body part that you want to measure (pressing the button in the center will make it easier
to pull) and place the rod at the end of the tape into the circular slot.
Step 2: Tighten tape to a snug fit.
Press the button in the center and let the tape retract to a snug fit. Make sure the tape is perpendicular to the body part and parallel with the ground. If you’re using a regular cloth tape, try to achieve a consistent tightness with each measurement.
Step 3: Record Measurements.
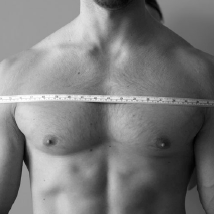
1. Shoulder girth
Measure at the widest point of the shoulders, around the entire shoulder area. Make sure you’re standing upright and breathing normally. Record the measure after a normal (not a forced) exhalation.
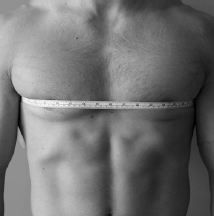
2. Chest girth
The maximal horizontal girth of the chest at the nipple line.Stand upright and pass the tape measure over the shoulder blades and under the armpits. Record the measure after a normal (not a
forced) exhalation.
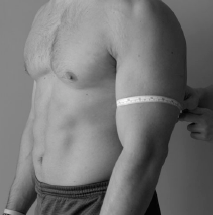
3. Upper arm girth
Measure halfway between the elbow and the bony point on the top of your shoulder. Measure this distance if you have to and take the mid-point.
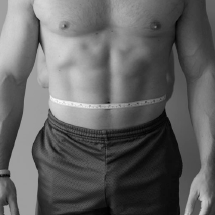
4. Waist girth
Measure at the navel. Stand upright and breathe normally with the abdomen relaxed. Record the measure after a normal (not a forced) exhalation.
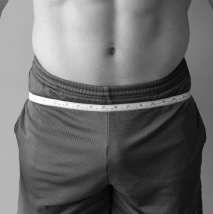
5. Hip girth
Measure around the glutes at the level of maximal circumference (aka the widest point).
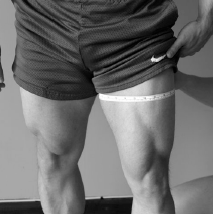
6. Thigh girth
Measure at the halfway point between the center of the kneecap and inguinal crease (the line where leg inserts into trunk). Measure the distance if you have to and take the mid-point.
Part 4: Photographs
When you begin any of our Golf Fitness Challenges, you should snap some photographs of your “before” physique. Then, every 2 weeks, we will repeat the same process. This will give us a before, mid-term, and a final photo summary of your progress.
For now, here’s what to do:
First, take photos of yourself from the front, from the side, and from the rear. We’ve provided instructions below for how to take progress photos. We won’t be asking you to do this every week, but it will be often enough that you’re going to want to have easy access to a digital camera.

How to take photos
- Clothing and location. Dressed in a small pair of shorts, stand against a bare wall.
- Camera setup. Set up your camera about 5-7 feet away from you so that it can capture your whole body from head to toe. You can use a tripod or have a friend snap the photo.
- Lighting. Make sure the room is well-lit and that you use the flash when taking your photo. However, make sure there isn’t a ton of overhead light; you don’t want to cast shadows.
- Three photos. Take 3 total photographs: one of your front side, one of your left side and one of your back side.

